October 30, 2013

Crumbs and grumbles

Our town has it's own Hobby Lobby store now! It opened up on my Birthday last week. It is a lovely store that has tatting supplies as well as new options for resin casting. I picked up a new type of  silicon molding compound.
It's a liquid that solidifies and I think will be good for 3d castings. I have to make time later to try it out. I also picked up a new type of resin to test.
The box says it cures in 10 minutes and is sandable. I did get a test piece made. It won't work for what I want it, shuttle making, unless its for a flat shuttle. You literally have 3 minutes from start to finish. I used up half the bottle figuring that out. I tried reinforcing with the regular resin I use, but it don't bond with different resin types. So it's more for pieces you want to paint, like clay working.

Once again my littlest child has created havoc with my crafting supplies. This time, she completely emptied all but one box of my resin as well as my mold making supplies. She left me one bottle of hardener, but it does me no good since it's a 1:1 ratio mix and when half of the ingredients are missing, there's no point in hanging on to it. I'm just going to have to get a locking tool center/chests  unless I'm specifically working with it. You'd think a locked room door would be enough....

Then I went to work and when I got home, she struck again. I don't understand why she is so fascinated by it. I used what was salvaged to attach a jump ring to the back of the plates so they can be hung on the wall.Even that was 'disturbed'. When I went to check on them, there were plastic drinking cups that i use to mix resin, sitting on every one of them. They were only half cured, so I did my best to salvage these.

 My options now are basically sanding it flush then putting another very thin layer of clear resin on it to level it all out. Checking on the other standard shuttle shaped molds, I was happy to see they were left relatively intact. This one is small about the size of a clover shuttle. I'm going to have to shape the bottom to the angle needed for tensioning. White stickers need a colored background to stand out. Otherwise it blends in too well. The molding material is wearing out so it has a bunch of small glitches in it. I'll try to fill it in with more resin and use that piece to make a new mold.


But since I'm currently resin-less, it'll have to wait until after rent gets paid to I can restock.$40 worth of resin, wasted. Terrible waste of resources.

October 10, 2013

Back at it

Now that I finally picked up some more supplies..let's get to work!
It finally clicked in my mind on how to create a better stability with the longer shuttles. It was so obvious I could kick myself.  I also picked up a palate of decorating chalks to test for color tinting. I could just use the transparent dyes made for resin, but part of the fun is experimenting. I have used eyeshadows before and they work great, but sometimes you don't want it all sparkley.

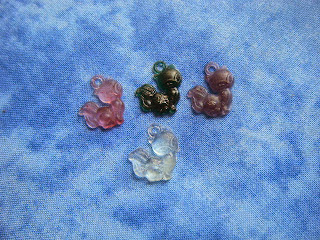
I picked up this cute little cat mold on Etsy from Decoratewithdetails. Honey says it looks like a fox more than a cat. It doesn't matter it's a cute little charm maker and I've already made a few!

A week from now is my birthday! I've been putting off opening up my own Etsy shop with these shuttles I'm making. I have four done and since I'm basically talking all next week off, I'm going to make more. So as a heads up, so to speak, for those who read this blog, I'm going to list four shuttles at midnight on October 17th. The remainder will go 'live' that following Saturday. So if you're interested that's when to look for them. The link for the shop. Right now it only has a resin pendant in it, but I'll be adding more soon.

August 21, 2013

Lady Hoare Shuttle Tutorial

I received a request for information from Patricia Greninger on Facebook on how to go about making a Lady Hoare style tatting shuttle with resin. This would be the simplest of shuttles to make since it generally is a flat shuttle. These, you will find, are mostly carved out of wood.

The steps in making a mold are generally all the same. I buy most of my supplies online. Either on Etsy.com or Amazon.com, although my local Michael's Craft Store also carries most of the actual resin I use, in store. I cannot stress the importance of using gloves enough. Make sure you take the proper precautions when handling resin. Never use your fingers to test how far along your piece has cured, always use a toothpick or something similar for this. Good thing about the toothpick is that you can also use it to pop air bubble if they form in your working piece. Let's get started!

1. Find a template. In this case, I use a piece of cardboard to cut out the general shape of my piece.


2. Prepare molding compound. For all my first runs, I use Oyumaru. It's re-usable and resin friendly. Also please do not use latex based mold making compounds for resin making. They will leave a cloudy reside on your resin that is a major pain, if not, next to impossible to get rid of on your pieces.
Note: You can use the mold you make with this to pour your resin directly into. I make a secondary permanent mold for heavy/multiple casting.


3. Make the actual mold. If you are using cardboard, remember to put the smooth side down. No matter what type of molding material you use, it is designed to pick up detail. So unless you want the little dents added, smooth side down. Another good thing about Oyumaru, is that it is ready to use in about 10 minutes! You can also speed up the time by cooling it in your freezer (for those of us who are impatient).


4. This step, I use UV curing resin and my newly acquired UV lamp. It perfect for my trial runs because I can find out in a few minutes verses a day, if my mold turned out right. If you are comfortable with using regular resin then go ahead. You can skip this trial run stage.
I added some paint to give it some color


5. After verifying my temporary mold worked out, I make a permanent mold out of Mold Easy. I use the sanded version of a piece made with the temporary mold for this. I do this because if I ever want to make another or more than one at a time, I can without having to do all the above steps again.


I will add another layer of UV resin to level it out, one side at a time


6. Mix your resin according to it's directions and have at it! You can add embellishments like stickers or glitter to your resin.
Please Note:
When you do this, it's highly recommended ( I should just say required) you lay down a THIN layer of clear resin and let it cure to a gummy stage before adding embellishments. Otherwise the pieces can sink to the bottom and protrude on the other side like bumps. If you want a colored background, you do the thin clear layer so you can see your embellishments when it is complete, and that you are working in reverse. The bottom of the mold is the top of the finished product. Also keep in mind that the more embellishments you add, the longer it takes the resin to cure. Make sure to check on your piece often, you don't want air bubbles in them by accident. Air bubbles can swiss cheese your piece.

7. Finishing

No matter how good you become at pouring the resin, you will always have to do some filing/sanding to smooth off the edges. This over flow of resin is called "flash". When getting into the smaller corners, I prefer to use a very thin round file and hand file it down. This way you don't end up taking off more than you intended. Or if you are using a rotary tool, use the smallest round head you can find.
I've looked at numerous YouTube videos and picked up a lot of tips on how to give a 'finished polished' look to my pieces. I've narrowed it down to two of the easiest. For smooth pieces, I just pour another thin clear layer of resin on the top. It gives it the "shiny look". For those that have indents, I use a spray.
One thing to keep in mind, it's best to work in layers. This way you actually end up wasting less product. There's no bigger disappointment than working hard and waiting all that time only to find your piece doesn't turn out the way you hoped. With layering, you are able to maintain a better control on what's going on and fix small mistakes(air bubbles, sticker placements, ect). It's also easier to give depth to multidimensional castings.

July 28, 2013

Supplying

I have been bulking up for supplies to make more shuttles. I made a few blades but have to make a new mold for the center post. The new shuttles I ordered to use as a template for my posts have arrived. I'm going to make the first prototype with my Oyumaru. With my Michael's having the long awaited 50% off coupon I stocked up by hitting both of the stores in my town on the two days I had to use it. First on the list was to purchase a UV lamp. This way I can make the trials at night and not be limited to daylight hours. I picked up the same brand as the UV resin, so far though, I'm thinking I got a defective unit because it isn't helping to cure anything. The room with the blinds drawn cure it faster than this lamp. I'm going to exchange it tomorrow in case it is a defective unit.

I also picked up all the bottles of UV resin both stores had. Sadly it was only 4 bottles. I wish they carried the larger bottle instead of the smaller 1 ounce size. Now that would be a coupon well spent. While there browsing the aisles I found a gloss varnish that was on clearance. After checking some reviews online, I picked up all three bottles. Combined they cost less than a medium cup of Chai Tea from Starbucks. So even if this doesn't work for my resin shuttles, it appears to be a good sealer for other things. The much needed Mold Putty is now part of my supplies as well. Unfortunately I only got one box. This was not stocked on a regular basis.

While out shopping I kept my eyes out on how to package the finished shuttles to send. After looking over different packaging, I decided on what they labeled as 'Pillow Cases'. They were found in the wedding section which meant overpriced. I was able to find a substitute at another store, and with a little bit of tissue paper in it, I believe it will give enough protection to survive the not so tender hands that manage shipping items.

July 8, 2013

Coming Together

Here is the blade with the post secured on one side. I was planning on making a permanent mold of just this portion. Unfortunately, to keep the blade detail, I would have to do a two part mold. This kind of defeated the purpose of doing one side together. I sanded the other side of the post to make it lay flush against the other side of the blade. This was a bit too long for the tips to touch to I shorten it as well until I got the fit I wanted.

I had to find a way to keep the points connected while the UV resin cured. I don't have any clamps to hold it, so I improvised with a twisty tie than came off  the packaging for my son's toy. I cut that in half and put it around where the hearts and oval connected. This actually worked out better than I expected. I was also able to adjust the tension by giving it another twist and it did not harm the blades in any way.


I was so impatient waiting for it to cure. The sun had already set by the time I had this portion ready. When I woke up I went out to my patio to get the shuttle and test to see if the resin had finished curing. It had! I was a bit apprehensive when I took off those twist ties. If it didn't set right I would have to cut off that post cast another one and redo this step. I only have half a day, a week to work on my projects, outside life takes up too much of my week. So if I had to start over it would be another week before I was able to try to fix this.
 I felt like it was Christmas morning. It worked and my shuttle retained the tension. The finished shuttle!


 I still have to decide whether to drill a thread hole into the center post or to leave it as it. For this one I think I'll leave it as is. I don't use the hole when I load my other post shuttles, so I see no need for it. Even though the center post is a bit more opaque than the rest of the shuttle, it still has those translucent flakes in it. I want my shuttle to match all the way through. There is still a small bit of sanding on one side and I'm thinking of adding some more resin to help stabilize the joining of the hearts to the center oval. The sizing compared to other shuttles in my collection.


July 7, 2013

Centering

After some trials and errors, I found a center post that should work. Originally I used regular resin, but it was taking too long to cure. Using the UV resin again, I used a glue stick and cut it to shape for the next Oyumaru mold. Twenty minutes later I had two different posts. I sanded that down and smoothed out the post. Then I added a little bit more UV resin to act as glue I set it back outside to cure. One plus to this crazy summer heat, is that I have plenty of sunshine to help dry that resin.

This current stage is the right form to make another template so I'm going to do that before I add the top of the shuttle. Since I already sanded and shaped both blades to fit snuggly together I'm going to make the second blade as a permanent mold as well. It should be a simple enough thing to connect the two sides together after this.

July 2, 2013

Shuttle take:2

Going back to the thought of sizing I went through what I had on hand to find a way of extending the shuttle. One thing I came across was the plastic tags I had picked up a few weeks ago.After playing with the shapes I settled on this oval one.
 I also found a mostly half full bottle of UV curing resin. I wanted a mold that I could create a test blade in a few hours as opposed to a few days. I went in search of my Oyumaru, and used that along with the UV resin to make another sample blade. Luckily for me, it was over 100 degrees outside, so I had plenty of sunlight to use to cure it.

I threw in some translucent flakes so it wouldn't be so see through and also so I could see how much of that resin I had poured in.


 About two hours later I had this ugly piece. The bottom was pretty solid but the top was still gel like. I think because instead of layering and curing it I just filled the temporary mold up to the rim and let it sit out in the sun. An unexpected benefit was that it was still malleable enough to bend into the curve needed for the shuttle blade.
 Here is the size comparisons to the other two blades I made previously.


After some sanding this beauty came out. It's all sparkly, it reminds me of an opal. The only downside is that I couldn't really make out the patterns on the hearts. It's been camouflaged by the flakes. I doubt it would have shown any better if the resin was kept clear.
The size is coming out better to what I wanted to encase my tatting in.Still not the right size but I'm getting closer.
 I could put some small tatting in the center oval. It is thick enough to add a motif made in size 80 thread. Also, it's not really flat there in the center. It is slightly concave so I could add a motif then add some more resin to dome it off. The underside is of course all smooth and the other side is also except inside the actual heart portions. I wanted to show off the detail so I mix up some regular resin added a small bit of black coloring and using the same Oyumaru mold, cast another blade. It ended up having a smokey cast with small bits still in it. When I checked it, it wasn't done curing. This is a good thing because I needed to bend it enough to shape the other blade. I placed both pieces together making sure the heart tips all touched, then gently pushed on the ends until I had a satisfactory bend to the center. Now the problem was keeping it like that until the resin finished curing. Surprisingly, the Oyumaru mold was the solution. It was just the right thickness to keep the bend I wanted for this piece.
The flash drowns out alot of the other detail so I took one with just the overhead lights on.

I also made a few extra hearts so I could make another mini shuttle in the smokey coloring. After they all finish curing I have to make a center post for this. For now I think I'm going to use industrial glue to put the post in. Later I think I will make a final mold where the post will be in two parts that will slide into one another, like a sleeve. I ordered some shuttles that come apart this way, and when they arrive I'm going to see how they hold up to actual use. It would make sense to have a slide in post to join so I could make the two blades at the same time with the different ends of the post built into the mold. I do believe that I will have to add another layer of stabilizing resin between the hearts and the oval. Since they aren't actually touching I don't want them to break off because of the thin layer of resin between the two motifs.

June 29, 2013

Shuttle and fishes

With the dawning realization that I will never receive my "Tatted Shuttles" that I ordered from the Shuttle Shop, I decided to try and make my own. I looked online for any tutorial to give a general idea on how to begin. There were none. So, beginning with the basics I already know, I began. Using a mold off a button I made, I based this trial off a picture I saw on Ebay of a shuttle for auction. It was two hearts used to form each side of it. On Ebay, it was made of wood.


 I already have a mold that will make two separate hearts. I created another one with them facing each other to start the blade. The problem with this is that when the resin is poured, I get a flat surface. I pushed the hearts deeper into the putty mold to try and get a concave setting more like the shape of the tatting shuttle. It sort of worked. The problem being that the blades turned out to be thinner than making the hearts separate.


I used Modge Podge to glue the two separate hearts together to form another blade. I set them in the mold I made for the joined to keep the sides touching while the glue dried. If the thinner bladed setting doesn't work, I can always use it to hold the pieces together like I did here while another coat of resin or industrial glue dries and cures.


I left it sitting overnight, and in the morning it had dried clear. As you can see there is a difference in the thickness of the two separate blades. The one that is thicker will most likely hold up better to continuous use. I had to make a center post now to hold the blades together. I'm using sculpting putty to create a shape. I don't want to have it too thick because it will interfere with how much thread could be loaded. But I need it to be thick enough to support and tension the two blades together.
 
It took a bit of maneuvering to find a middle ground. At first I had the blades more open in the center. This left the shuttle fatter in the center. I had issues with the points touching when it was like this. Because the mold with the two hearts connected was thinner it left the blades at a skew. After guiding the sides to lay parallel I managed to find a position that would keep it all in line with the points still touching.
 Using the handle end of a paintbrush, I shaped the center post to fit. I'm not to worried about putting a hole into the post right now, I can drill that in afterwards. I may not even drill a hole, I never use the hole in my other post shuttles. I just hold the thread to the side and begin to wind. There is a little bit of overlapping skew with the blades. I'm not worried at this point, it's minor enough that a small amount of sanding with make it even without compromising the blades or the design on top.

 
I'm going to leaving this to sit overnight so that putty can harden. Then I should be able to make a mold for resin with it. I would like to make a 3D mold with this but I don't have enough Easy Mold to make one. Looks like I'm going to have to make another trip to Micheal's to get more. Here we have the semi-finished prototype with the post in but not finalized.

 The spacing between the two hearts is good for holding the shuttle to keep it from flying out of your hand if you tat fast. This is the size comparison to a Clover Shuttle.
It's still relatively small compared to the others. For a trial, I'm happy with how it's turning out so far. I can get and test the mechanics involved with making a shuttle and later using larger templates, make one in a size I prefer. My goal is to have it be between the SewMate and the Starlit shuttle in size.


I also made another fish keychain.
I'm keeping this one for myself.